Rewriting Day Player for Sketch 40+
At 2 ½ my placeholder image plugin was showing signs of age and side-project neglect. I decided to make it a priority to get Day Player back in working order. In doing so, I would also need to educate myself on the latest in Sketch Plugin development. I didn't know it when I started, but I would also put together a fun build and release setup for Sketch plugins.
Day Player has a limited scope. It requests images from placeholder image services and places them in Sketch documents. This 3.0.0 rewrite and release hasn't changed the scope. I did end up cutting two features and adding a new one.
What got removed?
The first feature cut was the placeholder service Lorempixel.com. I removed it because it doesn't support https. Day Player doesn't transport sensitive data. Still, I decided not to use services without https support.
The second feature cut was remembering user values for each service. I cut this for time. I didn't want to hold up the release for a non-essential feature. There's a good chance I'll circle back and add this in the future. Or, if you're feeling up to it, open a pull request.
What’s new?
The one new feature is the ability to add an image with the same dimensions and position as an existing layer.

I added this because of a user request. While it's not exactly what the user was asking for, it feels close enough to get the job done. And, as a user myself, it's a welcome addition.
What’s next?
As expected, within a day or two of release, I got the first “this doesn't work” issue. After a quick back and forth, it seems we've isolated the problem to macOS Sierra. I'm a slow new adopter, so I still haven't reproduced the issue. Sooner than later I'll update a machine and find and fix what's broken. If you have any tips for what may have changed, let me know here or on that issue.
How do you build and release this?
So glad you asked. This is a topic I want to write in more detail about in the future because it's fun, but I'll give a few highlights now.
Building
I'm not using Babel or any other code transmogrifying. I write in the JavaScript available in JavaScriptCore. In my day-to-day JS I use Babel and enjoy using ES2015+ features. With the current JSCore we have access to a limited set of new features. We can use const (but not let). Template literals are available to make short work of string munging. And that's about it. No arrow functions or other niceties yet. They'll get there. As I do more plugin development, I'll likely update my build tooling to use Babel.
Sketch plugins give you access to the Cocoa Framework. This allows you to write JS to create and interact with Cocoa elements. If you've ever written code to do this, you know that it doesn't have the smoothest API. A fun aspect of Day Player was writing components to act as facades for each Cocoa element needed. These components allow me to write more idiomatic code. They also allow for writing less code and provide a chainable interface.
For example, here's the code required to create a text label using regular Cocoa:
const textField = NSTextField.alloc().initWithFrame(NSMakeRect(0, 0, 350, 16));
textField.setDrawsBackground(false);
textField.setEditable(false);
textField.setBezeled(false);
textField.setSelectable(true);
textField.setStringValue('My Label:');
and the code required using the Label component:
new Label({
  value: 'My Label:'
});
Each image service has similar options. Because of this, I was able to abstract common setup code to a few functions. Those functions live in utils.js. Utils.js also includes comments describing my learning process with the excellent and in-progress Sketch JS API.
Releasing
Installing Day Player takes 3 steps; download, unzip, double-click. It was important to make that process as easy as possible. I want the user to use the plugin, not spend time figuring out how to get it.
As as plugin author, it's also important that the release process is as painless as possible. The release process works by chaining 5 primary tools together. Make, Node.js, Git, Travis CI, and AWS S3.

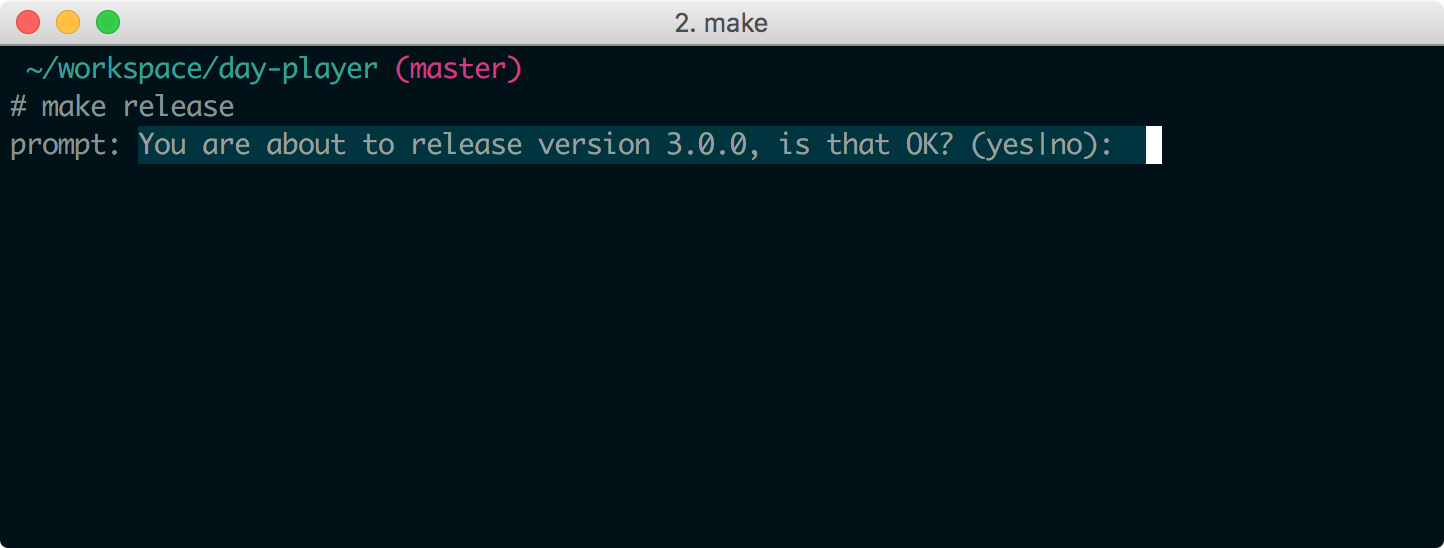
Here's how it works. When I'm ready to ship a new release I update the version in package.json. I then run make release. That in turn uses Node.js to execute the release.js script. I could run node scripts/release.js directly, but I prefer to put it in a Make target so all build commands are in one place.
Release.js first confirms I want to release. I put this in as check to keep myself from releasing an incorrect version. The script then creates a new Git tag and pushes it to the origin at GitHub. At this point, the process is on autopilot.
Travis CI now takes over. In travis.yml we have the following:
deploy:
- provider: script
  script: make publish
  on:
    tags: true
This tells Travis to watch for builds that create new Git tags. When it sees a tag it should run make publish after all other tasks are complete.
The publish Make target handles packaging the plugin and uploading it to S3. It first creates a zip file of the Sketch plugin bundle. Then using the AWS CLI, copies the zip file to the Day Player bucket; s3://day-player.
Interacting with AWS CLI in this way requires extra setup. First, we install the tool during the Travis install step.
install:
- pip install --user -U awscli
The next steps ensure Travis can make safe requests to AWS on my behalf. I set two environment variables in the travis conf. AWS_ACCESS_KEY_ID and an encrypted value for the secure key. The encrypted key:value is for the AWS_SECRET_ACCESS_KEY. The access key is not sensitive, so it's OK to be out in the open. The secret is for my eyes only. I used the Travis CLI tool to encrypt that value. You can read about that process in the Travis docs.
By default, the AWS CLI tool looks for the environment variables set above. Requests use them for authentication if found.
You may be wondering where the AWS access key and secret come from. This is an area where I use a best practice for handling AWS credentials. I've set up an AWS IAM Role that only has permission to upload objects to the Day Player S3 bucket. Setting up a restricted IAM Role is outside the scope of this post. A Google search for “IAM role for single bucket” returns up-to-date articles on the topic. That's how I figured it out for this process.
All this for placeholder images?
Yeah! This is a side project and my side projects are for learning, tinkering, and fun. If I also build things that are useful to other folks at the same time, that makes it even better.
Download Day Player 3.0.
Thanks for reading